Sentinel Pester Framework

When you work with one or multiple Microsoft Sentinel workspaces you may find it necessary to not only deploy Analytics rules and other configuration artifacts using a version controlled source control (CI/CD) to limit human error and enforce consistency. But you might also want to independently verify your deployment on a regular basis.
I certainly did and set out to write a test driven solution.
Since I love to use PowerShell and there is already a superb test framework, the tool to use for the task at hand was an easy choice: Pester.
In this post I will share the result of this work with the community:
The Sentinel Pester Framework.
Before we dive into the details of the Sentinel Pester Framework let me explain some basics.
What is Pester?
It’s a test and mock framework for PowerShell that allows you to to verify the result of any command or function.
While Pester wasn’t build for infrastructure testing, it’s not the first time used for this purpose and this use case is even mentioned in the official documentation.
With Pester you use one or multiple test files, usually named *.Tests.ps1, that contains your tests and can be run multiple times and as long as the test definition is not changed, the outcome should always be the same. The only other variable, that could lead to a failed test is the tested function code or in our case resource configuration.
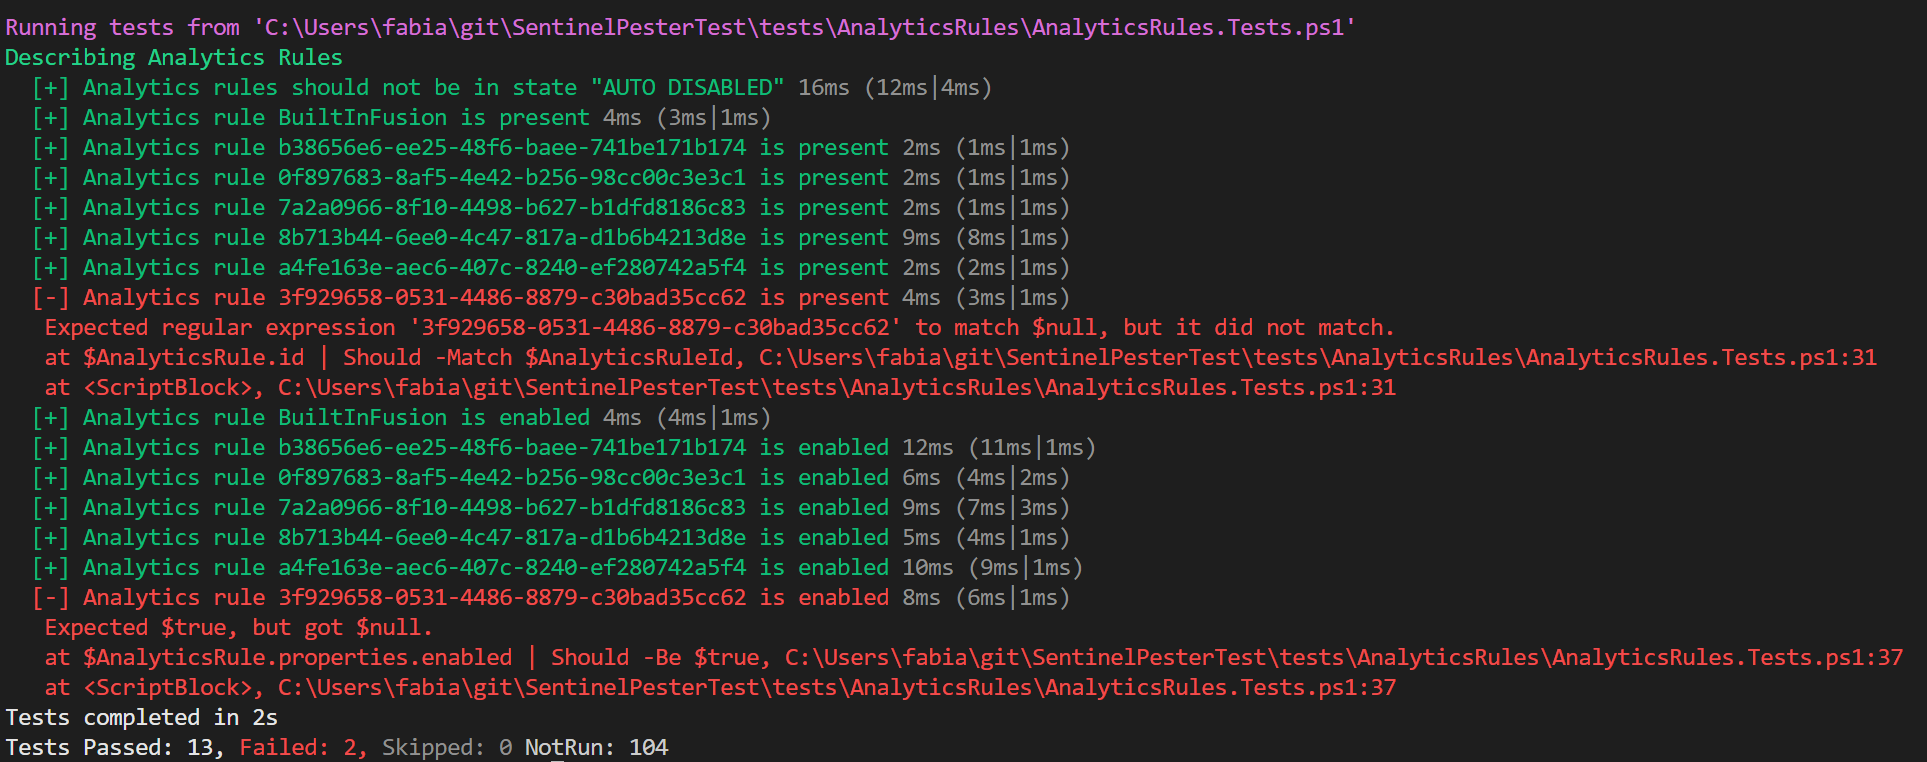
And this is exactly why this is such a powerful tool for validating your Sentinel environment. As you can see in the example below I tested the Analytics rules in my Sentinel workspace against a configured list of rules that should be present and enabled. Since one Analytics rule was not deployed two of the tests failed.
Define a Tests
As described Pester is organized in different files, normally one per function. One file contains multiple tests, defined as It. And in addition to that you can group tests in Context and Describe blocks.
For the example above I defined a test named "Analytics rule <_> is present" that checks if every Analytics rule id in the array $AnalyticsRuleIds is present in the $CurrentItems variable.
It "Analytics rule <_> is present" -ForEach @( $AnalyticsRuleIds ) {
    $AnalyticsRuleId = $_
    $AnalyticsRule = $CurrentItems | Where-Object { $_.id -match $AnalyticsRuleId }
    $AnalyticsRule.id | Should -Match $AnalyticsRuleId
}
The $CurrentItems list is queried at runtime from the Sentinel workspace, before the actual tests where run.
BeforeAll {
    $RestUri = "https://management.azure.com/subscriptions/{0}/resourceGroups/{1}/providers/Microsoft.OperationalInsights/workspaces/{2}/providers/Microsoft.SecurityInsights/alertRules?api-version=2022-11-01" -f $EnvironmentVariables.subscriptionId, $EnvironmentVariables.resourceGroup, $EnvironmentVariables.workspaceName
    $CurrentItems = Invoke-AzRestMethod -Method GET -Uri $RestUri | Select-Object -ExpandProperty Content | ConvertFrom-Json | Select-Object -ExpandProperty value
}
This way, every time you run the test, a current list of Analytics rules is retrieved and checked against the defined list of ids.
This basic principal is used for every test I defined as part of the Sentinel Pester Framework.
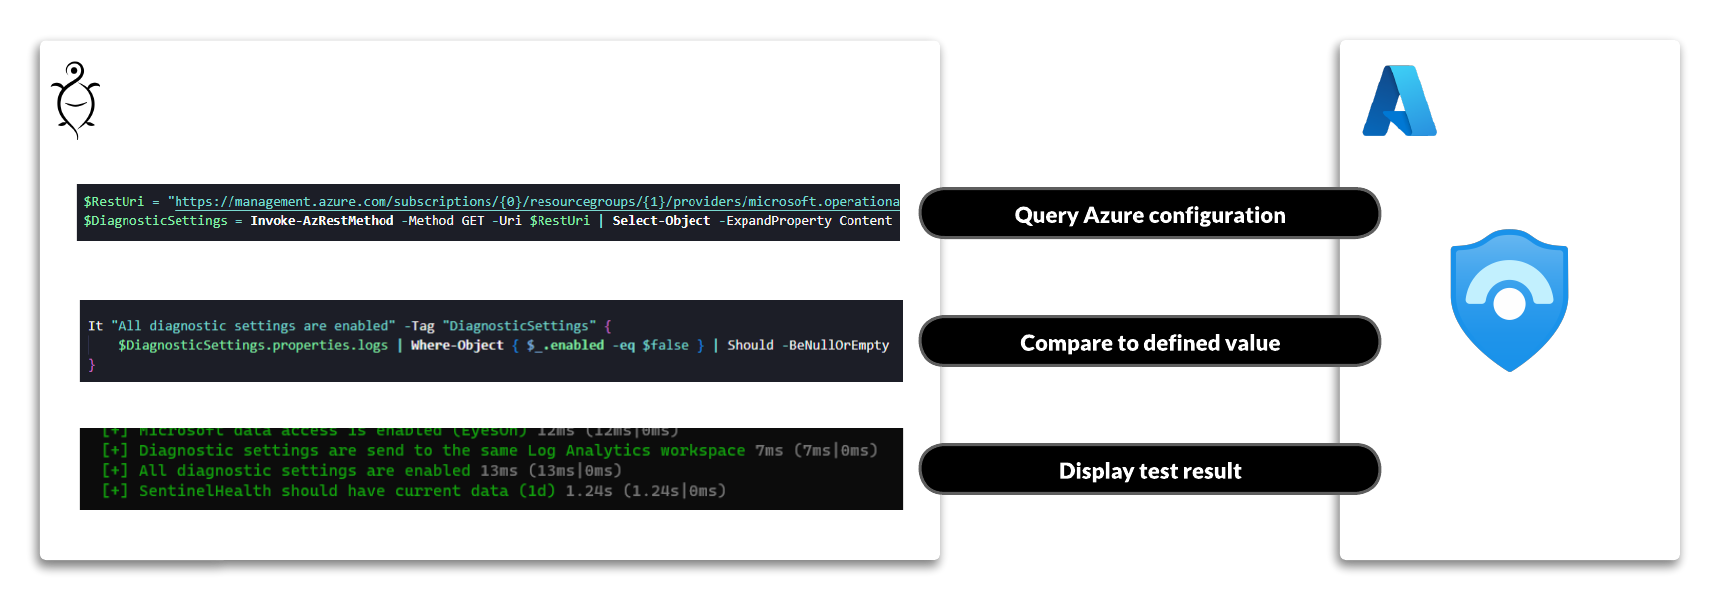
- The current configuration state is queried using the Azure REST API.
- This configuration state is compared to a defined value or, in some cases, a list of values
- The test result is displayed and/or written to a result file (NUnit)
Sentinel Pester Framework
As the name implies, the Sentinel Pester Framework is not meant as a tool to be executed without any modification. You should rather use it as a starting point to create a test solution for your Sentinel instance. Because my Sentinel configuration is definitely not the same as your Sentinel configuration.
Basic configuration
The most basic settings for the tests must be provided as parameters using Pester.
$configRunContainer = New-PesterContainer -Path "*.Tests.ps1" -Data @{
    # Define your environment variables here
    workspaceName  = "SentinelWorkspaceName"
    resourceGroup  = "resourceGroup"
    subscriptionId = "SubscriptionId"
}
workspaceName, resourceGroup and subscriptionId are mandatory parameters for all tests.
If you decide to use CI/CD based testing you must also define the parameter CICDPathRoot. This is the path to the root of your Sentinel configuration files that are deployed using CI/CD. Those files must be in the ARM format. But more on this later.
All other configuration or tweaking must be done in the test files themselves.
Tags
Pester makes it easy to categorize the tests. For this I used the built-in tagging solution. Each test has one or more tags assigned to it. This way you can choose exactly which tests are applicable for your environment, without having to delete the other tests. Maybe you will need them later on.
Here is a excerpt of the available tags. The full list is maintained in the GitHub repository.
| Tag | Description |
|---|---|
| configuration | Sentinel Configuration: All entries |
| anomalies | Sentinel Configuration: Anomalies |
| diagnosticsettings | Sentinel Configuration: Diagnostic Settings |
| entityanalytics | Sentinel Configuration: Entity Analytics |
| eyeson | Sentinel Configuration: Opt-Out of Microsoft data access |
| ueba | Sentinel Configuration: User and Entity Behavior Analytics |
| analyticsrules | Analytics rules |
| watchlists | Watchlists |
| dataconnector | Test all data connector (Not recommended) |
Some tags are used for multiple tests, that might even be spread over multiple test files. One example is the configuration tag. With this tag enabled you will run tests for multiple Sentinel and Workspace configuration settings.
Other tags like ueba are meant only for tests related to a specific feature.
Advanced configuration
As described above you must configure the target state of your Sentinel environment in the test files.
For example the test file for Azure Active Directory (AzureActiveDirectory.Tests.ps1) has by default all possible sources enabled. In most environments not all of those sources are enabled, which would result in test failures. You can easily comment out the ones you don’t need.
Describe "Sentinel Dataconnectors" -Tag "DataConnector" {
    Describe "Azure Active Directory should be connected" -Tag "AAD" {
        It "<name> should have current data (<maxage>)" -ForEach @(
            @{ Name = "SigninLogs" ; MaxAge = "1d" }
            @{ Name = "AuditLogs" ; MaxAge = "1d" }
            # @{ Name = "AADNonInteractiveUserSignInLogs" ; MaxAge = "1d" }
            # @{ Name = "AADServicePrincipalSignInLogs" ; MaxAge = "1d" }
            # @{ Name = "AADManagedIdentitySignInLogs" ; MaxAge = "1d" }
            # @{ Name = "AADProvisioningLogs" ; MaxAge = "1d" }
            # @{ Name = "ADFSSignInLogs" ; MaxAge = "1d" }
            # @{ Name = "AADUserRiskEvents" ; MaxAge = "30d" }
            # @{ Name = "AADRiskyUsers" ; MaxAge = "30d" }
            # @{ Name = "NetworkAccessTraffic" ; MaxAge = "1d" }
            # @{ Name = "AADRiskyServicePrincipals" ; MaxAge = "30d" }
            # @{ Name = "AADServicePrincipalRiskEvents" ; MaxAge = "30d" }
        ) {
            $FirstRowReturned = Invoke-WorkspaceQuery -WorkspaceQueryUri $WorkspaceQueryUri -Query "$name | where TimeGenerated > ago($MaxAge) | summarize max(TimeGenerated)" | Select-Object -First 1
            $FirstRowReturned | Should -Not -BeNullOrEmpty
        }
    }
}
Another example would be the test of the workplace settings (WorkspaceConfiguration.Tests.ps1). You might not have deployed your Sentinel workspace in the West Europe region. Just modify the test definition to match your region. And don’t forget to change the test name as well.
It "Workspace should be located in West Europe" {
    $WorkspaceProperties.location | Should -Be "westeurope"
}
You should not change the scope of the variable definition, since the scope is relevant for how Pester handles test discovery and test execution.
CI/CD integration
When you have connected a GitHub or Azure DevOps repository to Microsoft Sentinel and deploy the Sentinel artifacts using a pipeline, defining a hard coded list of Analytics rules or Automation rules is not really a great way to test the environment. This would result in a lot of manual changes when adding a new artifacts. And as we all know, those will be forgotten at some point in time.
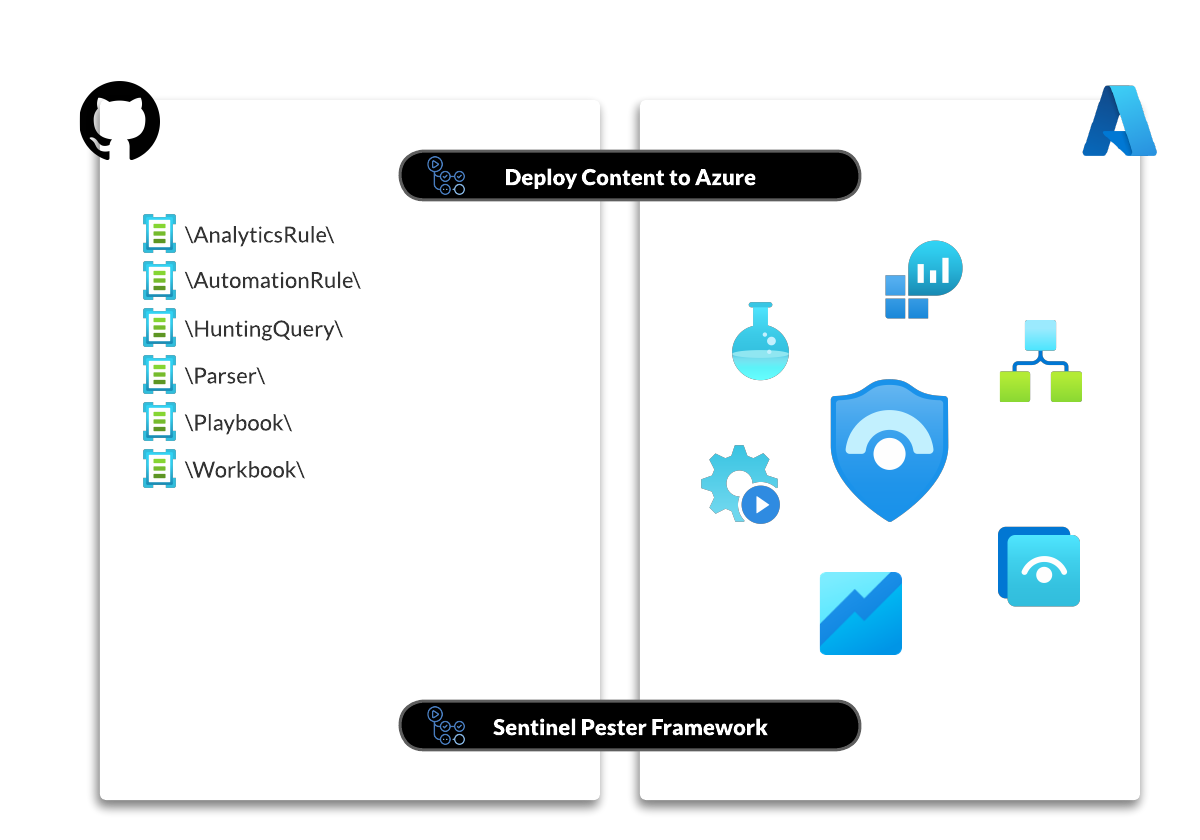
By default the artifacts, in the form of ARM templates, are organized in folders named
- AnalyticsRule
- AutomationRule
- HuntingQuery
- Parser
- Playbook
- Workbook
This we can leverage for our advantage.
For this scenario there are some special test rules, tagged with the suffix -CICD. Those tests enumerate the ARM files as part of the BeforeDiscovery phase of the Pester test and generate all tests dynamically based on the content. This way you can let the Sentinel Pester Framework do it’s job and focus on deploying awesome detections.
This approach is not suitable for all tests. That’s why there are currently only a few tests that support this mechanism but you can combine all tests as you like.
Your next step should be to create an action that runs the Pester test on a regular basis and makes sure that you will get the info, when something is wrong in your environment.
I created a sample repository that checks parts of my own Sentinel demo environment on GitHub. Feel free to check it out.
https://github.com/f-bader/SentinelSampleCICDRepo
Getting started
Now with the basic, and more advanced configuration steps explained, let’s get started. The easiest way to get started is to clone the repository https://github.com/f-bader/SentinelPesterFramework and modify the RunTest.ps1 file to match your environment.
Then change the tags to match the ones you want to test and modify the test files as well. You can skip the last part if you are just curious to see what happens.
Then run the RunTest.ps1 and get a nice list of successful and failed tests.

The failed tests are totally normal if you have not modified the tests files to match your environment.
Rhe next step is to change the test files, remove tags you don’t need and maybe even add new tests that are not yet available.
Available tests
In the first version of the Sentinel Pester Framework the following tests are built-in. Some tests are only available when using CI/CD tests. The regular tests can be combined with the CI/CD tests without any issue.
| Test | Regular | CI/CD* |
|---|---|---|
| Analytics rules should not be in state “AUTO DISABLED” | ✅ | ✅ |
| Analytics rule <_> is present | ✅ | ✅ |
| Analytics rule name is set to | ❌ | ✅ |
| Analytics rule <_> is enabled | ✅ | ✅ |
| Automation rule is present | ❌ | ✅ |
| Automation rule order is set to | ❌ | ✅ |
| Automation rule is | ❌ | ✅ |
| UEBA Source <_> is enabled | ✅ | ❎ |
| EntityAnalytics source <_> is enabled | ✅ | ❎ |
| Anomalies is enabled | ✅ | ❎ |
| Microsoft data access is enabled (EyesOn) | ✅ | ❎ |
| Diagnostic settings are send to the same Log Analytics workspace | ✅ | ❎ |
| All diagnostic settings are enabled | ✅ | ❎ |
| SentinelHealth should have current data (1d) | ✅ | ❎ |
| Workspace should be located in West Europe | ✅ | ❎ |
| Workspace retention is set to 90 days | ✅ | ❎ |
| Workspace capping should be disabled | ✅ | ❎ |
| Workspace access control mode should be “Use resource or workspace permissions” | ✅ | ❎ |
| Workspace sku should be “PerGB2018” | ✅ | ❎ |
| Workspace should not have a capacity reservation | ✅ | ❎ |
| Workspace should not purge data immediately | ✅ | ❎ |
| Workspace should have a cannot-delete lock | ✅ | ❎ |
Contributing
The provided tests are only the start of this framework. There are many artifacts and even more data sources not covered yet and maybe settings you like to see to be checked, that I didn’t even think about.
The easiest way to extend this framework is by writing new tests yourself. For data connectors you can just copy an existing one and modify the KQL query and naming. And if you have wrote the test, why not contribute it back to the community?
Head over to GitHub and create a Pull Request with the changes you made. Please try to stick to the current test style and don’t change existing example values without a functional need. Of course if you have suggestions to improve the overall code quality, feel free to reach out.
https://github.com/f-bader/SentinelPesterFramework
Conclusion
I hope this guide has provided you with enough information to get started with your own Sentinel Pester tests and keep your environment in shape. If you have any questions or need further assistance, don’t hesitate to reach out.
Thank you for reading and happy testing!